
Introduction to Homemade Panini Bread
Homemade panini bread is not just a culinary project; it’s a game changer for your meals! Imagine crafting a mouthwatering sandwich with fresh, warm bread that you made from scratch. There’s something uniquely satisfying about the aroma of baking bread wafting through your kitchen. Not only does it elevate your sandwich game, but homemade panini bread also offers the opportunity to customize flavors to suit your palate.
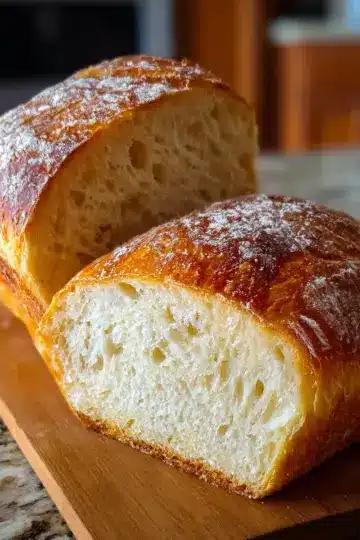
Why settle for store-bought options filled with preservatives when you can create your own? With a handful of simple ingredients like flour, yeast, and a touch of love, you’re in control of what goes into your food. You can experiment with different textures, like a crispy crust on the outside and a soft, chewy center, which elevates any filling, from turkey bacon and chicken ham to roasted veggies and gourmet cheeses.
If you want to delight friends and family at your next gathering or simply enjoy a decadent lunch, making homemade panini bread transforms routine meals into memorable culinary experiences. Let’s dive into how you can create this delightful bread right in your kitchen, and soon you’ll never want to go back to pre-packaged bread again!

Ingredients for Homemade Panini Bread
Essential ingredients for the perfect panini bread
Creating homemade panini bread starts with a few key ingredients that come together to deliver that delightful, chewy bite. Here’s what you need:
- 4 cups all-purpose flour: This forms the base of your bread and gives it structure.
- 1 ½ teaspoons salt: Essential for flavor, it also strengthens the dough.
- 1 teaspoon sugar: This helps to activate the yeast and balance the saltiness.
- 1 tablespoon dry yeast: Integral for leavening, it creates those lovely air pockets.
- 2 tablespoons very soft butter or oil: This adds richness and moisture to your bread.
- 1 ¼ cups warm water: Activates the yeast and binds the ingredients together.
Substitutions for dietary preferences
Don't worry if you have specific dietary needs! Many of these ingredients can be easily substituted:
- Flour: Swap all-purpose flour for whole wheat or gluten-free flour blend. Just note that gluten-free options may need additional binding agents.
- Salt: Use sea salt or Himalayan pink salt for a different flavor profile.
- Butter: Replace with vegan butter or coconut oil for a dairy-free version.
- Sweetener: Instead of sugar, try honey or maple syrup, adjusting the liquid accordingly.
With these ingredients and substitutions, you’re ready to prepare mouthwatering homemade panini bread that caters to your taste! For more tips on creating the perfect artisan-style bread, visit The Spruce Eats.
Step-by-step Preparation of Homemade Panini Bread
If you’ve ever craved a lovely, freshly baked loaf of homemade panini bread, you’re in for a treat! Making your own bread not only tantalizes your taste buds but also adds a personal touch to your meals. Follow these simple steps to create delicious panini bread from scratch.
Gather the Ingredients
To make our scrumptious panini bread, you'll need to collect the following ingredients:
- 4 cups of all-purpose flour
- 1 ½ teaspoons salt
- 1 teaspoon sugar
- 1 tablespoon dry yeast
- 2 tablespoons very soft butter or oil
- 1 ¼ cups warm water
Make sure your ingredients are fresh for the best flavor!
Combine Dry Ingredients
In a large mixing bowl, combine the flour, salt, and sugar. Using a whisk or a fork, mix these dry ingredients thoroughly. This step ensures that the salt and sugar are evenly distributed throughout the flour. It’s a simple yet crucial stage to enhance the flavor of your homemade panini bread.
Make the Dough
Next, add the dry yeast, soft butter, and enough warm water to form a soft, sticky dough. Don’t be afraid to adjust the moisture; sometimes, a little more flour or water can help get the right consistency. Just remember: it should be soft and tacky, not overly dry.
Knead the Dough
Now, it’s time to knead! You can do this by hand or with an electric mixer fitted with a dough hook. Knead the dough for about 5 to 10 minutes until it achieves a smooth and elastic texture. If you’re new to kneading, don’t fret—just keep folding and pressing the dough, and it will come together beautifully.
Let the Dough Rise
Transfer your dough to a lightly oiled bowl, shaping it into a mound. Cover the bowl with plastic wrap and a towel, letting it rise in a warm, draft-free area for about 30 minutes to an hour. Watch as your dough nearly doubles in size!
Shape the Rolls
Once your dough has risen, gently punch it down and divide it into 10 to 12 plum-sized balls. Place them on a lightly floured surface and cover them with a cloth. Let these rest for another 15 to 20 minutes to allow the gluten to relax.
Final Rise Before Baking
Preheat your oven to 400°F about 20 minutes before baking. While your oven heats up, take each ball of dough and gently shape it into a flat, oblong roll about 6 inches long. Transfer them to a baking sheet lined with parchment paper, giving them space to expand. Cover and let them rise for another 30 to 60 minutes.
Bake the Panini Bread
Finally, it’s time for baking! Place your panini rolls in the middle of the preheated oven and bake for approximately 8 minutes, or until they are set and scarcely colored. Once out of the oven, allow them to cool before slicing. You’re now ready to fill them with your favorite ingredients for delicious sandwiches!
Enjoy your homemade panini bread and savor the delightful flavor of fresh-baked goodness!

Variations of Homemade Panini Bread
Herb-infused Panini Bread
Elevate your homemade panini bread with fragrant herbs. Try adding fresh or dried herbs like basil, rosemary, or thyme directly into the dough. This not only infuses the bread with delightful flavors but also creates an aromatic backdrop for your sandwiches. Imagine sinking your teeth into a warm, crispy roll that sings with Italian seasonings. For a twist, consider sprinkling some garlic powder or incorporating some finely chopped sun-dried tomatoes for a punch of flavor.
Whole Grain Panini Bread
For a healthier option, whip up a batch of whole grain panini bread. Substitute half or all of the all-purpose flour with whole wheat flour or a blend of your choice. This variation offers extra fiber and nutrients, making your sandwiches more filling and nutritious. Whole grain bread also adds a nutty flavor and a hearty texture, perfect for pairing with roasted vegetables or lean chicken ham. Plus, it’s an excellent way to sneak some wholesome ingredients into your meals without sacrificing taste!
Cooking Tips and Notes for Homemade Panini Bread
Creating delicious homemade panini bread is straightforward, but a few tips can elevate your results.
-
Flour Choice: While all-purpose flour works great, consider using bread flour for a chewier texture that holds up well against moist fillings.
-
Kneading Technique: If you’re unsure about kneading, try the “windowpane test.” Stretch a piece of dough—if it forms a thin, translucent film without tearing, you’re good to go!
-
Pre-heating: Don’t skip preheating your oven! This ensures even baking and a delightful crust.
-
Ideal Fillings: For best results, fill your panini with ingredients like turkey bacon, chicken ham, or rich cheeses.
With these tips, you’ll master your homemade panini bread in no time! For more expert advice, check out this guide to bread baking.

Serving Suggestions for Homemade Panini Bread
Classic Panini Sandwich Ideas
When it comes to using your homemade panini bread, the options are endless! For a classic twist, try a turkey bacon and Swiss cheese combo with fresh spinach, or go for a savory grilled chicken ham with pesto. The toasty crunch of your bread perfectly complements the melted goodness of your ingredients!
Creative Toppings and Fillings
Feeling adventurous? Experiment with unexpected flavors! How about a roasted red pepper and mozzarella delight, paired with a drizzle of balsamic glaze? Or whip up a Mediterranean-inspired panini with feta, olives, and arugula. Don’t hesitate to blend sweet and savory by adding peach slices with goat cheese for a delicious contrast.
Your homemade panini bread is the perfect base to let your creativity soar! For even more inspiration, check out these tasty grilled panini recipes or stuffing ideas.
Time Breakdown for Homemade Panini Bread
Preparation Time
To kick things off, you'll need about 20 minutes for preparation. This includes gathering your ingredients and mixing your dough—a perfect time to unwind and enjoy some good music while you measure out your flour and tackle the yeast.
Cooking Time
The cooking phase is relatively brief at just 8 minutes! This is when your homemade panini bread transforms from doughy goodness into golden, soft rolls.
Total Time
All in all, the total time will be about 2 hours and 28 minutes, which accounts for the rest and rise of the dough. Remember, good things take time, and this wait leads to perfectly fluffy rolls ready for your favorite sandwiches!
Feel free to explore more about bread making here and elevate your baking skills!
Nutritional Facts for Homemade Panini Bread
Calories per serving
Each serving of homemade panini bread contains approximately 349 calories. It's a satisfying option for a hearty sandwich or a delicious side.
Carbohydrates
This delightful bread offers around 65 grams of carbohydrates per serving, making it a great energy source to fuel your day.
Protein content
You'll find about 9 grams of protein in each slice of homemade panini bread, which contributes to a balanced meal, especially when paired with protein-rich fillings like grilled chicken or turkey bacon.
For more insights on healthy eating, visit Nutrition.gov or ChooseMyPlate.gov.
FAQ about Homemade Panini Bread
Can I freeze homemade panini bread?
Absolutely! Freezing your homemade panini bread is a great way to enjoy it later. Just wait for the bread to cool completely before wrapping it tightly in plastic wrap or aluminum foil. For optimal freshness, you may want to place the wrapped bread in a resealable bag. It can be stored in the freezer for up to three months. When you're ready to use it, simply thaw at room temperature or pop it in the toaster for a warm-up.
How do I store leftover panini bread?
To keep your leftover panini bread fresh, store it in an airtight container or a resealable bag at room temperature for up to three days. If you think you won’t finish it in that time, go ahead and freeze it! Just make sure to slice it first, as this makes it easier to use directly from the freezer.
What kind of fillings work best with panini bread?
The beauty of panini bread lies in its versatility! Here are some delicious filling ideas:
- Grilled veggies with goat cheese
- Turkey bacon and avocado
- Chicken ham with fresh basil and pesto
- Mozzarella and sun-dried tomatoes
Experiment with different combinations and flavors to find your perfect panini! For more filling inspirations, check out these grilled sandwiches.
Conclusion on Homemade Panini Bread
Homemade panini bread is a delightful treat that enhances any sandwich experience. The soft texture and lightly crisp crust not only add character to your favorite fillings but also makes meal prep enjoyable. Try experimenting with different fillings for a new twist, and savor every bite!

Homemade Panini Bread
Equipment
- large bowl
- Stand mixer with dough hook
- baking sheets
- parchment paper
- plastic wrap
- Towel
Ingredients
- 4 cups all-purpose flour
- 1.5 teaspoons salt
- 1 teaspoon sugar
- 1 tablespoon dry yeast
- 2 tablespoons very soft butter or oil
- 1.25 cups warm water
Instructions
- Gather the ingredients.
- In a large bowl, combine the flour, salt, and sugar.
- Add the yeast, butter, and enough warm water to make a soft, sticky dough. Add a little more flour or a little more water if necessary to achieve that consistency.
- Knead the dough by hand or with an electric stand mixer and dough hook for 5 to 10 minutes until smooth and elastic; the dough should remain tacky so you may find that a stand mixer is easiest.
- Transfer the dough to an oiled bowl, gather it up into a mound, and turn it over. Cover the bowl with plastic and then a towel and set aside in a draft-free place to rise until doubled, about 30 minutes in a very warm kitchen or an hour or longer in a cool kitchen.
- Divide the dough into 10 to 12 plum-sized balls. Set the balls of dough on a lightly floured surface, cover, and leave to rest for 15 to 20 minutes.
- Line one or two baking sheets with parchment paper. Take a ball of dough and gently spread and shape it into a flat, oblong roll about 6 inches in length. Transfer it to the prepared pan and repeat with the remaining dough, allowing space between each roll for expansion. Cover and leave the rolls to rise for 30 to 60 minutes. Preheat oven about 20 minutes before baking to 400 F.
- Place the panini rolls in the middle of the oven and bake for about 8 minutes, or until set and barely colored. Remove from the oven and allow to cool before slicing lengthwise along one side and building sandwiches.



Leave a Reply