
Introduction to Jellycat Birthday Cake
Why a Jellycat Birthday Cake is Perfect for Celebrations
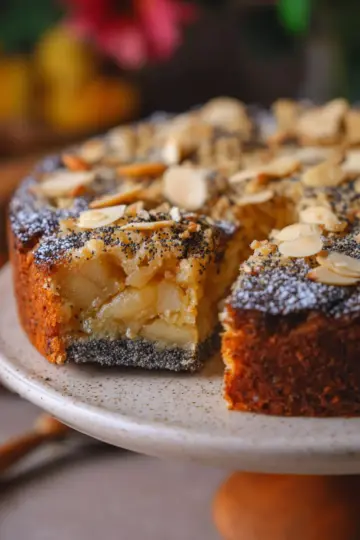
When it comes to birthdays, the cake is often the centerpiece of the festivities. Imagine gathering your friends and family around a beautiful Jellycat Birthday Cake, where each slice reveals delicious layers of vanilla cake, strawberry jam, and whipped cream. This delightful dessert brings joy and color to your celebrations, making it not just a treat but a memorable experience.
A Jellycat is cherished for its charming character and adorable aesthetics, and this recipe captures that playful spirit. With vibrant strawberries and homemade whipped cream, it’s guaranteed to light up any birthday party. Moreover, it’s a fantastic opportunity to showcase your baking skills while creating a cake that resonates with youthful energy. Some statistics suggest that homemade cakes bring people together, fostering greater connections during celebrations – a perfect reason to get your hands messy in the kitchen!
Ready to impress your guests? This accessible recipe ensures even novice bakers can whip up a stunning dessert that will become the star of any birthday bash. So gather your ingredients, and let’s dive into creating the delightful Jellycat Birthday Cake that everyone will remember!
For tips on baking techniques and ingredient alternatives, check out resources like King Arthur Baking or Bon Appétit.
Ingredients for Jellycat Birthday Cake
Creating the perfect Jellycat Birthday Cake involves using high-quality ingredients that make every bite memorable. Here’s a breakdown to get you started!
Cake Layers
For the base, you'll need:
- 225 g all-purpose flour: This is your primary structure.
- 1 ½ teaspoons baking powder: Essential for a light and fluffy texture.
- ½ teaspoon salt: Enhances the sweetness.
- 3 large eggs: Fresh and at room temperature for the best rise.
- 225 g granulated sugar: Provides the right sweetness.
- 85 g unsalted butter: Adds richness.
- 190 g milk (dairy or non-dairy): For moisture.
- 2 tablespoons oil: Ensures tenderness.
- 1 ½ teaspoons vanilla extract: For that aromatic flavor.
Filling
Next comes the delicious filling:
- 300 g whipping cream: Whip it cold for the best volume.
- 30 g powdered sugar: Sweetens the cream.
- 1 teaspoon vanilla extract: More flavor goodness!
- 1-2 teaspoons cocoa powder: For chocolatey goodness.
- 4 tablespoons strawberry jam: Adds a delightful fruity layer.
Decoration
Finish it off with charming decorations:
- 2-3 fresh strawberries, halved: They not only look pretty, but they also are delicious!
- 1 birthday candle: Let’s make it festive!
- 20 g dark chocolate, roughly chopped: For cute facial features.
With these ingredients, your Jellycat Birthday Cake will be a delightful centerpiece for any celebration. Feeling inspired? Make sure to explore more creative cake ideas here or check out tips on cake decoration. Happy baking!
Preparing Jellycat Birthday Cake
Baking a Jellycat Birthday Cake is an absolute delight, and it’s easier than you might think! With fluffy vanilla cake layers, luscious strawberry jam, and heavenly whipped cream, it's sure to be a crowd-pleaser at any celebration. Let's dive into the steps to create this sweet masterpiece right in your kitchen.
Step 1: Prepare Your Equipment and Ingredients
Before you get your hands dirty, it’s essential to have your equipment and ingredients ready. Here’s what you’ll need:
-
Equipment:
-
Two 6-inch round cake pans
-
An electric hand mixer
-
Three piping bags
-
Ingredients:
-
All-purpose flour, baking powder, and salt for the cake
-
Large eggs, granulated sugar, unsalted butter, milk, and vanilla extract
-
Whipping cream and powdered sugar for the filling
-
Fresh strawberries and strawberry jam for that fruity kick
Getting everything in place will save you time and ensure a smoother baking process. Got your cake pans greased and lined with parchment paper? Perfect! You’re ready to bake.
Step 2: Make the Cake Layers
Now comes the fun part—making the cake layers! Preheat your oven to 350°F and start by preparing your dry and wet mixtures. Beat together the eggs and sugar for about six minutes until the mixture is pale and fluffy, then gently fold in the dry ingredients. The key is to mix until just combined, avoiding overmixing. Trust me, this will give you light and airy cake layers. Pour the batter into your prepared pans and bake for 35-40 minutes. Let them cool completely on a wire rack.
Step 3: Prepare the Filling
While your cake layers are cooling, it’s time to whip up the filling. Combine cold whipping cream, powdered sugar, and vanilla extract in a large bowl. Using your electric mixer, whip until soft peaks form, then scoop a little into a separate bowl to mix with cocoa powder for a delightful chocolate touch. This adds a fun twist to the otherwise classic filling!
Step 4: Assemble the Jellycat Cake
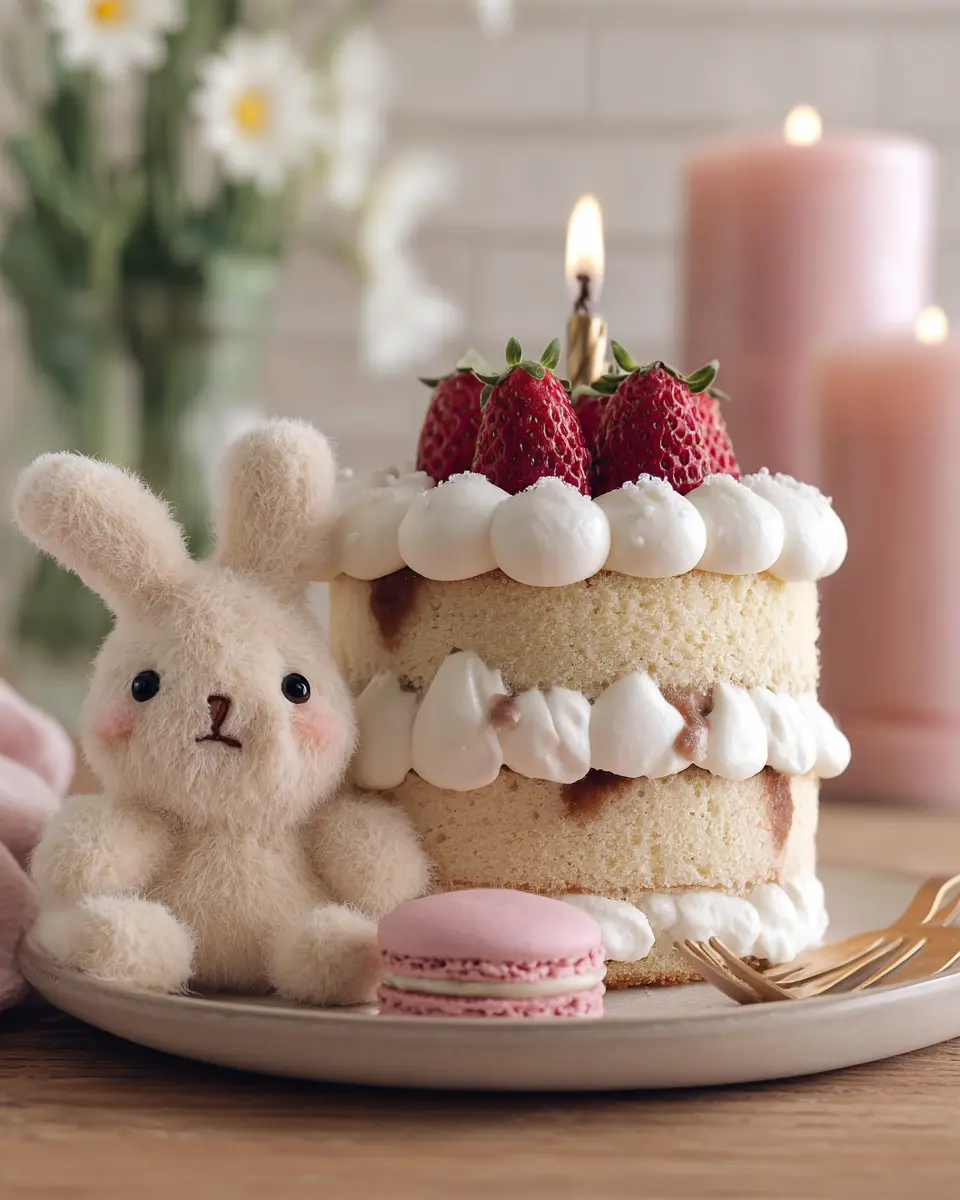
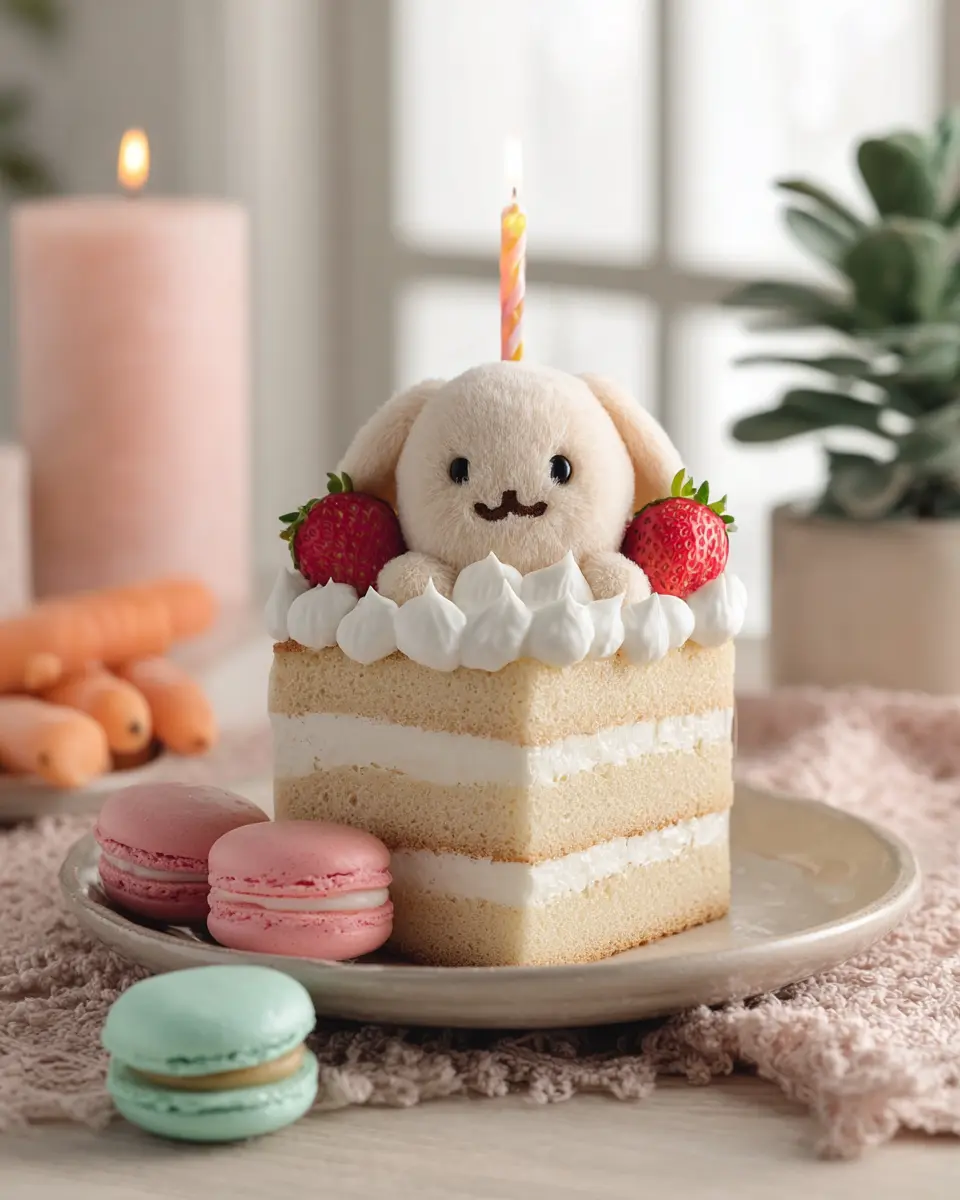
With the layers cooled and the filling ready, it’s time to assemble your Jellycat Birthday Cake. Place the first cake layer on your serving plate, pipe dollops of whipped cream around the edge, and fill the center with strawberry jam. Smooth it out for an even finish. Place the second cake layer on top, and repeat the process with more whipped cream.
Step 5: Decorate with Love
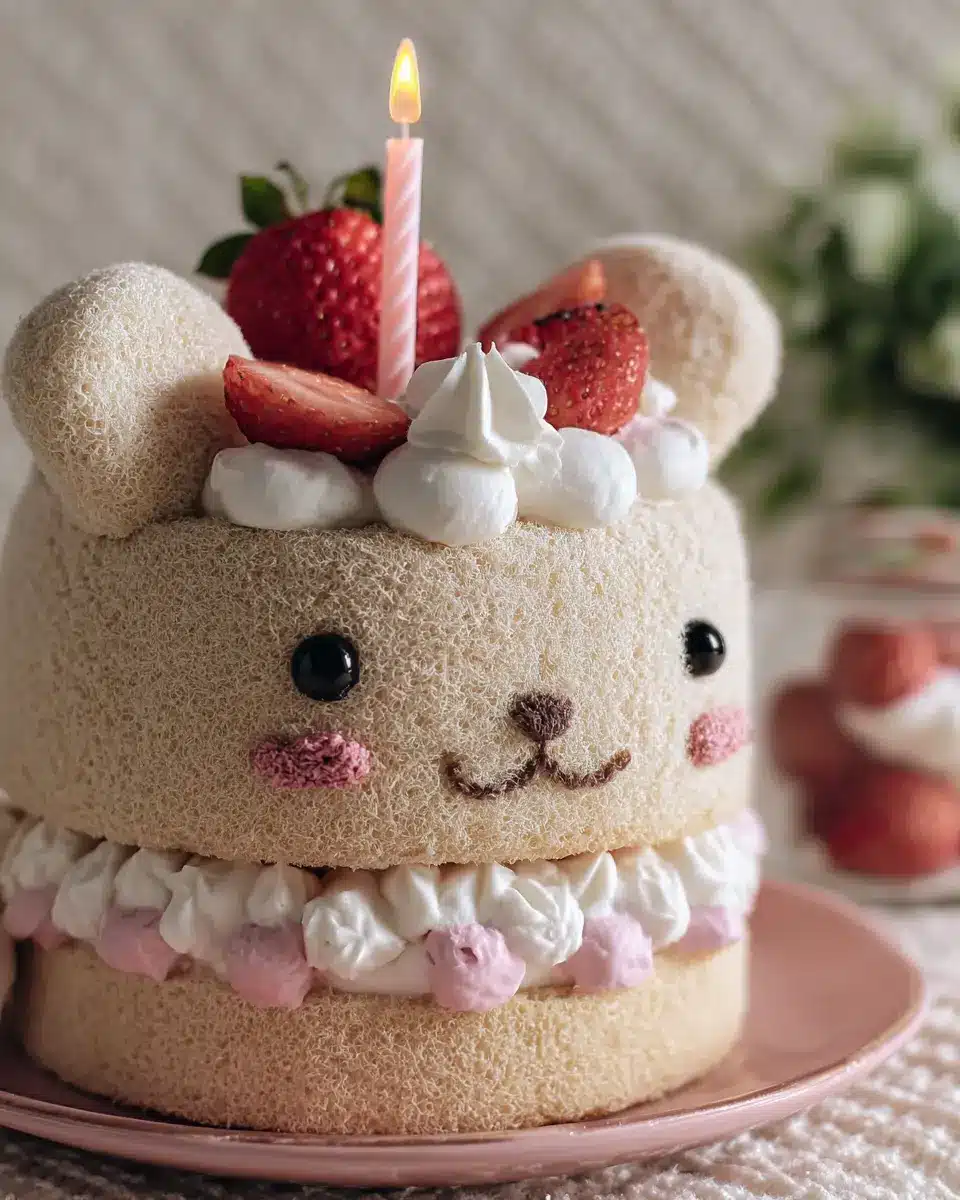
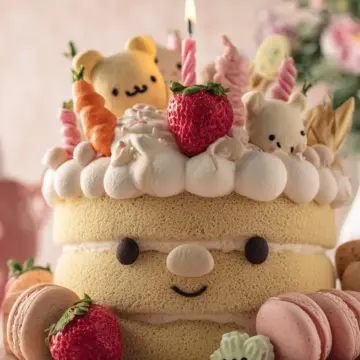
Now for the fun part—decoration! Use the chocolate whipped cream to pipe little legs on the bottom cake layer and create a cute face using melted dark chocolate. Don’t forget to top it with halved strawberries and a birthday candle. Each step in this process showcases your creativity and love, making the Jellycat Birthday Cake not just a dessert but a heartfelt gift for your loved ones.
For more tips on decorating cakes, check out this fabulous cake decoration resource.
Now, grab your apron and start baking—your Jellycat Birthday Cake is just a few steps away from being the star of the party!
Variations on Jellycat Birthday Cake
Exploring different variations of Jellycat Birthday Cake can add an exciting twist to your celebrations! Whether you prefer rich chocolate flavors or fruity delights, here are two fun alternatives to consider.
Chocolate Jellycat Birthday Cake
If you’re a chocolate lover, this version is calling your name! Simply replace the vanilla extract with chocolate extract and add a generous 70% dark chocolate layer within the cake. You can also incorporate chocolate chips into the cake batter for added texture. The whipped cream can be easily transformed by folding in melted chocolate. Voila! You have a rich, decadent Jellycat Birthday Cake that satisfies every sweet tooth.
Fruit-Infused Jellycat Birthday Cake
For a refreshing twist, consider infusing your cake with seasonal fruits. Replace the strawberry jam with a mix of raspberry or blueberry preserves for a vibrant color and flavor explosion. Layer fresh fruits in between the cake layers, and consider topping the cake with a medley of berries for a stunning finish. This fruity take on the classic Jellycat Birthday Cake brings a lovely balance of sweetness and tartness, perfect for summer birthdays.
These variations not only please the palate but also make great conversation pieces at any birthday gathering!
Baking Notes for Jellycat Birthday Cake
Tips for Successful Cake Layers
To create the perfect layers for your Jellycat Birthday Cake, take care to measure your ingredients accurately. Using room temperature eggs and gently incorporating the dry and wet ingredients will ensure a light, fluffy texture. Remember not to overmix; it's okay if a few flour patches remain. This method enhances the rise while baking, resulting in beautifully moist layers. Also, let your cakes cool completely before frosting—this helps the whipped cream stay stable and not melt off.
Whipped Cream Considerations
When whipping your cream, ensure it's cold for optimal volume and texture. Start with soft peaks and finish with firm peaks, which will hold up well in your cake. If you prefer a touch of extra sweetness, the addition of powdered sugar is a fantastic way to enhance flavor while stabilizing the whipped cream. Want to explore more whipped cream tips? You can check out this guide from the Kitchn for a deeper dive!
Serving suggestions for Jellycat Birthday Cake
Ideal Accompaniments
When you're ready to serve your Jellycat Birthday Cake, think about pairing it with delightful accompaniments. A cup of freshly brewed coffee or a hot chocolate can balance the cake's sweetness beautifully. For a refreshing touch, serve alongside a scoop of vanilla ice cream or a dollop of whipped cream. If you’re hosting a party, a fruit platter featuring seasonal fruits will elevate the dessert experience while keeping it light.
Presentation Ideas
Make your Jellycat Birthday Cake truly shine by presenting it with flair. Consider using a colorful cake stand to create a visually appealing centerpiece. Surround the cake with confetti, fresh strawberries, or even little birthday-themed trinkets for added charm. For extra pizzazz, try decorating slices with a drizzle of chocolate sauce or a sprinkle of edible glitter. Remember, we eat with our eyes first—so make it fun and festive!
For more creative cake decorating ideas, check out sites like The Spruce Eats to get your inspiration flowing!
Jellycat Birthday Cake
Author: Gail Ng
Your favourite jellycat birthday cake in edible cake form! Vanilla cake layers with strawberry jam, whipped cream, and fresh strawberries.
Prep Time: 50 minutes
Cook Time: 40 minutes
Cooling Time: 1 hour
Total Time: 2 hours 30 minutes
Yield: 8 servings
Category: Dessert
Cuisine: American
Equipment
- 2 6" round cake pans
- 1 electric hand mixer
- 3 piping bags
Ingredients
Cake Layers
- 225 g all-purpose flour
- 1 ½ teaspoons baking powder
- ½ teaspoon salt
- 3 large eggs, room temperature
- 225 g granulated sugar
- 85 g unsalted butter
- 190 g milk, dairy or non-dairy
- 2 tablespoons oil
- 1 ½ teaspoons vanilla extract
Filling
- 300 g whipping cream or heavy cream, cold
- 30 g powdered sugar
- 1 teaspoon vanilla extract
- 1-2 teaspoons cocoa powder
- 4 tablespoons strawberry jam, store-bought or homemade
Decoration
- 2-3 fresh strawberries, halved
- 1 birthday candle, with white and red stripes if possible
- 20 g dark chocolate, roughly chopped
Cook Mode: Prevent your screen from going dark
Instructions
Cake Layers
- Prep: Preheat oven to 350°F. Line two 6" round cake pans with a round of parchment paper on the bottom of each pan. Set aside.
- Dry mixture: In a small bowl, stir together flour, baking powder, and salt. Set aside.
- Hot milk mixture: In a small pot or microwave-safe bowl, add the butter, milk, oil, and vanilla extract. Heat it on the stovetop or in the microwave until the butter has melted. Don't let it boil. Remove it from the heat and cover to keep it warm while you start making the batter.
- Beat eggs and sugar: In a large mixing bowl, add the eggs and sugar. Use an electric hand mixer fitted with a whisk attachment to beat the mixture for a full 6 minutes at medium speed or until the mixture has tripled in size and becomes very pale (almost white) in colour.
- Combine dry and wet mixtures: Add half of the flour mixture and mix on low speed until just barely combined. Add the rest of the flour and mix until mostly combined. Some flour patches are fine because you'll continue mixing some more in the next step and we don't want to overmix.
- Add hot milk mixture: With the mixer on low speed, slowly stream in the hot milk mixture until you have a smooth and fluid batter.
- Fill pans: Divide the batter into your lined cake pans until about halfway full.
- Bake: Bake cakes for about 35-40 minutes or until a toothpick inserted in the middle comes out mostly clean with a few crumbs.
- Let cool: Let the cakes cool in the pans for about 15 minutes before running an offset spatula around the edges of the pan. Release the cakes onto a wire rack to cool completely.
Filling
- Whip cream: In a large mixing bowl, add the whipping cream, powdered sugar, and vanilla extract. Use an electric hand mixer fitted with a whisk attachment to beat the cream until it becomes soft peaks. Scoop out a small amount of whipped cream into a small bowl and set aside. Finish beating the cream to firm peaks.
- Chocolate whipped cream: To the portion of cream you scooped out, add the cocoa powder and mix until the cream is tinted brown. Transfer this cream to a small piping bag and snip off the tip. Set aside.
- Fill piping bags: Transfer both the whipped cream and the chocolate whipped cream to separate piping bags and cut the tips off.
Assemble and Decorate the Cake
- Pipe cream: On a large serving plate or cake board, place down the first cake layer. Pipe dollops of whipped cream along the edge of the cake, ending towards the middle of the cake. Use a spatula to smear the tail ends of the dollops towards the middle of the cake.
- Add strawberry jam: To the middle of the cake, add the strawberry jam. Smooth it into an even layer with an offset spatula without disturbing the whipped cream.
- Decorate the top: Place the second cake layer on top. Pipe more dollops of whipped cream on top of the cake. Arrange halved strawberries on top of the cream. Insert a candle in the middle.
- Pipe legs: With the brown whipped cream, pipe little legs on top of the plate, extending out from the bottom cake layer.
- Draw the face: Melt the chopped dark chocolate in the microwave or on the stovetop, transfer the melted chocolate to a small piping bag, and snip the tip off. Pipe eyes and a smile on the bottom cake layer in between the legs.
Nutrition
Calories: 530kcal | Carbohydrates: 63g | Protein: 7g | Fat: 28g | Saturated Fat: 15g | Polyunsaturated Fat: 2g | Monounsaturated Fat: 9g | Trans Fat: 0.4g | Cholesterol: 129mg | Sodium: 273mg | Potassium: 142mg | Fiber: 1g | Sugar: 39g | Vitamin A: 945IU | Vitamin C: 3mg | Calcium: 117mg | Iron: 2mg
Tips for Making the Perfect Jellycat Birthday Cake
Achieving the Right Texture
To ensure your Jellycat Birthday Cake has the perfect light and fluffy texture, take the time to beat the eggs and sugar until pale and voluminous. This airiness is crucial for a delightful cake. Consider using a kitchen scale to measure your ingredients accurately for the best results.
Decorating Techniques
When it comes to decorating, don't hold back! Use piping bags to create fun, whimsical designs, like the signature Jellycat eyes and legs. Fresh strawberries not only taste great but also add vibrant color! Remember, presentation can make your cake memorable—so get creative, and have fun! For more decorating ideas, check out resources like Cake Decorating Techniques for inspiration.
Time details for Jellycat Birthday Cake
Planning to whip up a delightful Jellycat Birthday Cake? Here’s what you need to know about the timing:
Preparation Time
Get ready to dive into the fun! You’ll take about 50 minutes to prep all the ingredients and get your kitchen set up.
Baking Time
The baking part will take around 40 minutes. Keep an eye on your cakes—when the toothpick test shows mostly clean, they’re good to go!
Total Time
From start to finish, you’ll need about 2 hours and 30 minutes to enjoy your cake! This includes cooling time, so you’re ready to slice and serve when it’s time to celebrate!
Feel free to check out other cake recipes like this classic vanilla cake or explore tips for decorating cakes at Cake Decorating Tips. Happy baking!
Nutritional Information for Jellycat Birthday Cake
Before you dig into the delightful layers of the Jellycat Birthday Cake, here’s a quick look at its nutritional content. Each slice (serving) brings a burst of joy along with some essential dietary info you may want to consider:
Calories
A single serving of this cake packs about 530 calories, perfect for a celebratory treat that won’t weigh you down.
Sugars
With 39 grams of sugar, this cake definitely satisfies your sweet tooth. If you're watching your sugar intake, consider enjoying a smaller slice or pairing it with some fresh fruit.
Fats
This Jellycat delight has 28 grams of total fat per slice, which includes 15 grams of saturated fat. While fats are an essential nutrient, moderation is key!
Whether you’re hosting a birthday bash or treating yourself, remember that balance is essential. Check out Healthline for more insights on incorporating treats into a balanced diet!
FAQs about Jellycat Birthday Cake
Can I use different flavors for the cake?
Absolutely! While the classic recipe features a delightful vanilla base, feel free to experiment with flavors like chocolate, lemon, or even funfetti to match your taste or theme. Just remember to balance the flavors with your chosen filling and frosting to create an enticing final product.
How do I store leftovers of Jellycat Birthday Cake?
If you have any leftovers (which might be a rarity!), store the Jellycat Birthday Cake in an airtight container in the refrigerator for up to three days. If you want to preserve its freshness longer, wrap individual slices in plastic wrap and freeze for up to a month. Just let them thaw at room temperature before enjoying!
What if I don’t have a cake mixer?
No worries! A sturdy whisk and a little elbow grease will do the trick. Beat your ingredients vigorously in a large mixing bowl. It might take a bit longer, but you’ll still achieve that fluffy texture. Many bakers swear by this method for a more hands-on approach!
For more tips on customizing and enjoying your Jellycat Birthday Cake, check out expert resources like Serious Eats or King Arthur Baking. Happy baking!
Conclusion on Jellycat Birthday Cake
In conclusion, the Jellycat Birthday Cake is not just a treat for the taste buds but also a visual delight! This delightful recipe combines light vanilla cake layers with sweet strawberry jam and fresh whipped cream. Your loved ones will certainly savor every forkful while celebrating their special day. Happy baking!
Jellycat Birthday Cake
Equipment
- 2 6" round cake pans
- Electric hand mixer
- 3 piping bags
Ingredients
Cake Layers
- 225 g all-purpose flour
- 1.5 teaspoons baking powder
- 0.5 teaspoon salt
- 3 large eggs eggs room temperature
- 225 g granulated sugar
- 85 g unsalted butter
- 190 g milk dairy or non-dairy
- 2 tablespoons oil
- 1.5 teaspoons vanilla extract
Filling
- 300 g whipping cream or heavy cream, cold
- 30 g powdered sugar
- 1 teaspoon vanilla extract
- 1-2 teaspoons cocoa powder
- 4 tablespoons strawberry jam store-bought or homemade
Decoration
- 2-3 fresh strawberries halved
- 1 birthday candle with white and red stripes if possible
- 20 g dark chocolate roughly chopped
Instructions
Cake Layers
- Preheat oven to 350°F. Line two 6" round cake pans with a round of parchment paper on the bottom of each pan. Set aside.
- In a small bowl, stir together flour, baking powder, and salt. Set aside.
- In a small pot or microwave-safe bowl, add the butter, milk, oil, and vanilla extract. Heat it on the stovetop or in the microwave until the butter has melted. Don't let it boil. Remove it from the heat and cover to keep it warm while you start making the batter.
- In a large mixing bowl, add the eggs and sugar. Use an electric hand mixer fitted with a whisk attachment to beat the mixture for a full 6 minutes at medium speed or until the mixture has tripled in size and becomes very pale (almost white) in colour.
- Add half of the flour mixture and mix on low speed until just barely combined. Add the rest of the flour and mix until mostly combined. Some flour patches are fine.
- With the mixer on low speed, slowly stream in the hot milk mixture until you have a smooth and fluid batter.
- Divide the batter into your lined cake pans until about halfway full.
- Bake cakes for about 35-40 minutes or until a toothpick inserted in the middle comes out mostly clean with a few crumbs.
- Let the cakes cool in the pans for about 15 minutes before running an offset spatula around the edges of the pan. Release the cakes onto a wire rack to cool completely.
Filling
- In a large mixing bowl, add the whipping cream, powdered sugar, and vanilla extract. Use an electric hand mixer to beat the cream until it becomes soft peaks.
- Scoop out a small amount of whipped cream into a small bowl and set aside. Finish beating the cream to firm peaks.
- To the portion of cream you scooped out, add the cocoa powder and mix until the cream is tinted brown.
- Transfer this cream to a small piping bag and snip off the tip. Set aside.
- Transfer both the whipped cream and the chocolate whipped cream to separate piping bags and cut the tips off.
Assemble and decorate the cake
- On a large serving plate or cake board, place down the first cake layer. Pipe dollops of whipped cream along the edge of the cake, ending towards the middle of the cake.
- To the middle of the cake, add the strawberry jam. Smooth it into an even layer with an offset spatula without disturbing the whipped cream.
- Place the second cake layer on top. Pipe more dollops of whipped cream on top of the cake. Arrange halved strawberries on top of the cream. Insert a candle in the middle.
- With the brown whipped cream, pipe little legs on top of the plate, extending out from the bottom cake layer.
- Melt the chopped dark chocolate and transfer it to a small piping bag. Pipe eyes and a smile on the bottom cake layer in between the legs.
Leave a Reply